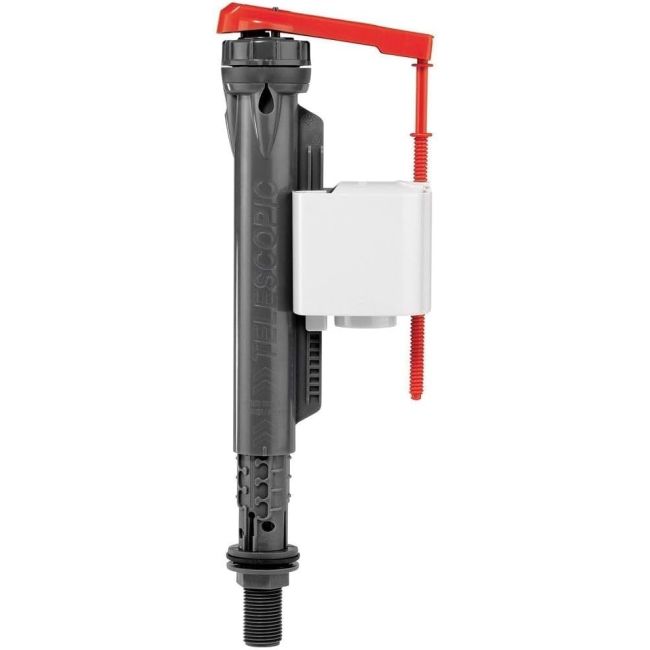


Macdee Wirquin 10 FLUSH MECHANISMS JOLLYFILL TELESCOPIC B/E INLET 1/2" 16110101
£6.99
Wirquin Macdee 16110101 Telescopic B/E 1/2in Tail 16110101
Availability:
In stock
SKU
16110101
Wirquin Macdee 16110101 Telescopic B/E 1/2in Tail 16110101 is available to buy in increments of 1
Wirquin Macdee 16110101 Telescopic B/E 1/2in Tail 16110101
Mastering Cistern Maintenance: A Professional Guide to Replacing the Wirquin 16110101 Inlet Valve
A properly functioning toilet cistern is fundamental to the efficiency and hygiene of any modern bathroom. At its heart lies the inlet valve, a critical component responsible for controlling the water supply that refills the cistern after each flush. When this valve malfunctions, it can lead to a host of issues, from irritating continuous running water to significant water wastage and even potential property damage. Among the myriad of plumbing components, the Wirquin 16110101, a popular bottom-entry Jollyfill inlet valve, is a common fixture in many households. This article provides a professional, step-by-step guide to understanding, removing, and installing this specific valve, empowering homeowners and maintenance professionals alike to tackle this essential plumbing task with confidence and precision.
Understanding the Wirquin 16110101 Inlet Valve and Its Importance
The Wirquin 16110101 is a robust and widely used bottom-entry float valve designed for toilet cisterns. Its primary function is to regulate the flow of water into the cistern, ensuring it refills to a predetermined level and then shuts off completely, preventing overflow. This mechanism is crucial for water conservation and the overall operational integrity of the toilet system.
Recognizing the signs of a failing inlet valve is the first step towards effective maintenance. Common indicators that your Wirquin 16110101 may require replacement include:
Continuous Running Water: This is perhaps the most common symptom, where water constantly trickles into the toilet bowl even when the cistern is full. This indicates the valve is not sealing properly.
Slow or Incomplete Refilling: If the cistern takes an unusually long time to refill, or doesn't fill to the correct level, the valve might be partially blocked or failing to open fully.
No Refilling: In severe cases, the valve may completely fail to open, leaving the cistern empty after a flush.
Visible Leaks: Water pooling around the base of the cistern or dripping from the valve's connections suggests a compromised seal or a crack in the valve body.
Addressing these issues promptly by replacing the faulty valve not only prevents unnecessary water consumption and higher utility bills but also safeguards against potential water damage to your bathroom floor or ceiling below.
Essential Tools and Safety Precautions for Replacement
Before embarking on the replacement process, it is imperative to gather the necessary tools and adhere to fundamental safety protocols. Proper preparation ensures a smooth and efficient operation, minimizing potential complications.
Required Tools:
Adjustable Spanner or Wrench: For loosening and tightening nuts.
Flathead Screwdriver: Potentially needed for minor adjustments or prying.
Bucket and Towels: To catch any residual water and clean up spills.
New Wirquin 16110101 Inlet Valve: Ensure it is the correct model for a direct replacement.
Pipe Thread Tape (PTFE Tape) or Plumber's Putty (Optional but Recommended): For ensuring watertight seals on threaded connections.
Work Gloves (Optional): For hygiene and protection.
Safety Precautions:
Turn Off Water Supply: This is the most critical step. Locate the isolation valve for the toilet (usually a small tap on the pipe leading to the cistern) and turn it clockwise until the water flow stops. If no isolation valve is present, the main water supply to the property must be shut off.
Drain the Cistern: Flush the toilet to empty the cistern as much as possible. Use a sponge or towel to soak up any remaining water.
Mindful Handling: Plastic components can be brittle if overtightened. Apply appropriate force and avoid excessive pressure.
Ventilation: Ensure adequate ventilation if working in a confined space.
Step-by-Step Replacement Procedure for the Wirquin 16110101
With your tools ready and safety measures in place, you can now proceed with the systematic replacement of the Wirquin 16110101 inlet valve.
Preparation and Disconnection:
Confirm the water supply to the toilet is completely shut off.
Flush the toilet to empty the cistern. Use a sponge to remove any residual water from the bottom of the cistern.
Locate the flexible water supply hose connected to the bottom of the inlet valve, underneath the cistern. Using your adjustable spanner, carefully loosen and disconnect this hose. Be prepared for a small amount of water to drain out, so have your bucket and towels ready.
Removing the Old Valve:
From underneath the cistern, locate the large plastic retaining nut that secures the inlet valve to the cistern base.
Using your adjustable spanner, turn this nut counter-clockwise to loosen and remove it.
Once the retaining nut is removed, the old inlet valve can be carefully lifted out from inside the cistern. Note the position of any washers or seals.
Cleaning the Cistern Opening:
With the old valve removed, take this opportunity to clean the opening in the cistern base. Remove any limescale, sediment, or debris that may have accumulated. A clean surface ensures a better seal for the new valve.
Installing the New Wirquin 16110101 Valve:
Ensure the new Wirquin 16110101 valve has its rubber sealing washer correctly seated on its threaded shaft, typically on the inside of the cistern.
Insert the new valve into the opening in the cistern base from the inside.
From underneath the cistern, thread the plastic retaining nut onto the valve's shaft. Hand-tighten it first, ensuring it's straight and not cross-threaded.
Once hand-tight, use your adjustable spanner to give it an additional quarter to half-turn. Avoid overtightening, as this can crack the cistern or the valve's plastic components. The goal is a snug, watertight seal.
Reconnecting the Water Supply:
If using pipe thread tape, wrap it clockwise around the threads of the new inlet valve's connection point (where the flexible hose attaches).
Reconnect the flexible water supply hose to the new valve. Hand-tighten first, then use your spanner for a final snug turn. Again, do not overtighten.
Testing and Adjustment:
Slowly turn the water supply back on at the isolation valve.
Allow the cistern to fill. Carefully inspect all connections for any signs of leaks. If leaks are present, gently tighten the connections further or re-apply thread tape.
Once the cistern is full, observe the water level. The Wirquin Jollyfill valve typically has an adjustable float mechanism. If the water level is too high (risking overflow) or too low (affecting flush efficiency), adjust the float arm or screw mechanism according to the manufacturer's instructions until the desired water level is achieved (usually just below the overflow pipe).
Flush the toilet several times to confirm proper operation, ensuring the valve shuts off completely and the cistern refills efficiently.
Troubleshooting Common Issues Post-Installation
Even with careful installation, minor issues can sometimes arise. Here are a few common problems and their professional solutions:
Leaks at Connections:
Solution: Ensure all nuts are adequately tightened (without overtightening). Disconnect, re-apply pipe thread tape or plumber's putty, and re-tighten. Check that rubber washers are correctly seated and not damaged.
Continuous Running Water:
Solution: The float mechanism might be set too high, or debris could be preventing the valve from fully closing. Adjust the float to a lower level. If the problem persists, the valve might need to be briefly removed and checked for any trapped debris.
Slow Filling:
Solution: Check the water supply hose for kinks. Ensure the isolation valve is fully open. Low water pressure in the property could also be a factor, though less common after a valve replacement.
No Filling:
Solution: Double-check that the water supply to the toilet is fully open. Ensure the valve's internal mechanism isn't jammed (though unlikely with a new valve).
Conclusion
Replacing a faulty Wirquin 16110101 inlet valve is a manageable plumbing task that, when approached systematically and professionally, can significantly improve the efficiency and longevity of your toilet system. By understanding the valve's function, preparing adequately with the right tools, and following a precise step-by-step procedure, you can restore your cistern to optimal working order. This proactive maintenance not only prevents the annoyance of a malfunctioning toilet but also contributes to substantial water savings and provides the peace of mind that comes with a well-maintained home. Empowering oneself with such practical skills is an invaluable asset in modern homeownership, ensuring comfort and functionality for years to come.